Keep reading because this is no ordinary post, its a hop and you'll be able to link to other blogs for more inspiration for Dress Pattern No.15 and there's also a giveaway too! To get yourself a copy of Dress Pattern No.15 by E+M Patterns click here or here for Etsy users, don't forget to use the code "TOUR15" at checkout for a special discount.
This is what you'll need to make this project:
- Dress Pattern No.15 by E+M Patterns and all the materials required fo make this pattern
- About 12 to 20 inches of 1/4 inch elastic for the shoulders
- Safty pin
Start by assembling the pattern and trace the front and back pattern piece. You will not need the extra pieces for the shoulder ties or the piece to make the casing for those ties.
Before we start to assemble the dress we're going to shape the hi-low hem. If you've noticed this dress has a slight a-line and also a curved hemline to give the dress a nice drape. On the front of the dress I want to make the hemline curve up in the same manner as it curves down in the back so I simply flip my pattern piece over to use it as a template.
Next step, cut out the curve to create that slight hi-low hem. I wanted to make sure that my curve wouldn't have a point at the center front at the hemline that's why I used my flipped over pattern piece as a template, but you can have your hem line curve the way you like it.
Lay your fornt and back pieces on your work table with right sides together. You'll be able to see if you like the contrast you've created for your hemline, and you can trim a little more off at this point if you want to. Sew shoulder seams with a 1/2" seam allowance and press open.
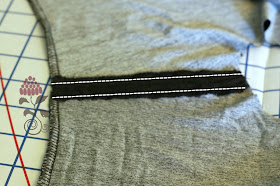
Top stitch to create 2 casings at the shoulders.
Cut 4 pieces of 1/4" elastic (2 for each side). I used 3 inches for a size 3. With the help of a safty pin thread the elastic through the casings and stitch the ends of the elastics in place to create the gathers at the shoulders. Finish of the neckline then the side seams as instrcuted in the pattern tutorial. Before finishing off the hem if you have your little model around, try it on so that you can adjust the hemline if needed.
You can finish off the hem using a rolled hem or twin needle or just a regular stitch for knits. Make sure you press your seams and hems to give your dress a nice crisp look.
I think I figured out the perfect use for this fabric, I've had it in my stash, no joke, for about 12 years!
Take a look at all the other stops on this tour...and don't forget to enter the giveaway!
October 6 - Sprouting JubeJube (That's here!) - Sew out of Control
October 7 - All Sew Up by Stacey - Blink
October 8 - Sew Cool for the Tween Scene - Rebel and Malice
October 9 - Gal Original Creations - Sibling Revelry
October 10 - Bonnie and Lottie - Pattern Nut
October 11 - Rita Pirolita - Cars and Crafts
a Rafflecopter giveaway


Cute dress! She's getting to be a little model with her little poses :)
ReplyDeleteThat *is* a perfect use of that fabric! Thanks for the hack!
ReplyDeleteBought this pattern last week! Can not wait to make it for my daughter.
ReplyDeleteThat is a perfect use for that fabric. I love it!
ReplyDeleteLoving the hack - very creative and nice and simple. Great job mama!
ReplyDeleteLooks very cute and classic
ReplyDeleteSuper cute - I want to know where you got that great fabric?
ReplyDeleteLove the fabric. The scale was perfect for the dress!
ReplyDeleteGood things come to those who wait! Great matching up of fabric to pattern.
ReplyDeleteLOVE e+m patterns! she has such great style (sorry if this is a repeat, I'm not seeing my other comment). thank you for the pattern hack!
ReplyDeleteAnother amazing hack from you Deb!! I love that fabric. It suits the dress perfectly
ReplyDeleteSo adorable and that fabric is amazing!
ReplyDeleteBrilliant! Shirring isn't my favorite,
ReplyDelete