Pages

Thursday, December 7, 2017

Handmade Holiday Tour with Love Notions

À tous les années, sans faute, les filles reçoivent un nouveau pyjama pour le temps des fêtes. Parfois, j'avoue que je les achète, mais cette année j'ai pris le temps de coudre.  


It happends every year, without fail, the girls get a new set of PJ's. Sometimes I must admit they are store bought, but most times I manage to take time to sew them up. 


J'aime bien un pyjama avec un thème de Noël mais quand le temps des Fêtes est terminé je ne veux plus les voire, alors un pyjama fleurie pour JubeJube cette année avec le patron Moto Maxx de Love Notions (lien affilié).  


I do like Christmas themed pyjamas, but then when the holiday season is over I can't stand to see them... especially come spring time, it's almost like seasonal depression, I want to see the flowers in bloom and feel the heat of the sun on my face. So now you know where I'm going with the fabric selection on this PJ set I made for JubeJube using the Moto Maxx pattern by Love Notions (affiliate link).


Je comprend pas que je n'ai jamais utilisé ce patron avant! Et je n'en crois pas que je dois faire un 7ans pour JubeJube! La première fois que je me suis servie d'un patron Love Notions j'ai confectionnée un Trendy Tunic grandeur 2T.

Le patron Moto Maxx n'est pas seulement pour faire des pyjamas, on peut s’en servir pour faire des vêtements de tous les jours. Il y a plusieurs options de manches ainsi que différents options d'ourlet pour le t-shirt.


I can't believe I haven't used this pattern before! I also can't believe I made JubeJube a size 7! Just a bit of trivia for you: the first pattern I ever made using a Love Notions pattern was the Trendy Tunic, I made JubeJube a size 2. Check out the cute face here (Click!) don't comment of the poor photography, lol.

The Moto Maxx set isn't just for PJ's, it can be used for everyday wear too. The top has a short sleeve option and also the long sleeve without the cuff, the hem line can be either a staight or scalloped. The usual features are included in this PDF, layered printing and trimless pages for quick assembly. 


Les pantalons ont aussi plusieurs options, avec ou sans poches, avec ou sans bandes à la cheville.


The pants have pocket options... front hip pockets and back pockets with flaps. I made the pants using a front hip pocket (note to self, check pockets before putting the pants in the laundry!). 


Avec la machine Brother j'ai pu personnaliser le t-shirt de JubeJube, j'ai trouvée le modèle sur le site Designs by JuJu. Le tissu Art Gallery de la collection Recollections à été acheter chez Club Tissus


I used the embroidery machine by Brother to add a special touch to the front of the t-shirt. I found Inspired Sayings by Designs by JuJu, and thought it would be a perfect match to the fabric and to JubeJube's way of thinking. The fabric is Art Gallery, Recollection purchased at Club Tissus.


Et vous voyez a l'arrière sur le mur, les drapeaux? C'est un aperçu d'un nouveau patron de Rebecca Page, il sera disponible en Janvier 2018!


And by the way, see that bunting in the back, just a sneak peek of a pattern being released in January 2018 by Rebecca Page. I'll have more about that when the pattern is released!


Jetez un coup d’œil sur les autres billet blog dans cette tournée, il y a plusieurs idées cadeaux! 

Take a look a all the other handmades on this tour, there are some great gift ideas! 


Sunday, November 12, 2017

One Thimble No.17 - Full Review

I had so much fun with this issue of One Thimble. One Thimble No. 17 (affiliate link) is so full of fun little and some not so little projects. 

I stayed away from clothing this time and made several little things that can be perfect for gift giving. 


The Blossom Flower Pincushion by My Little China Doll is a project I actually made twice. The first one wasn't to my liking so try, try again. The second row of petals didn't hug the center as much as in my second version. A little tip for that, simply pull that thread used to make the gathers really tight and secure it.


In the tutorial, it is suggested that instead of sewing the petals in place by hand, a glue gun can be used. I sewed mine in by hand, only because I couldn't find my glue gun I have to admit. Its just a bit longer but at least I know that if I gift this pincushion it won't fall apart. I tend to not used enough glue, lol.

This is also a perfect project for using up scraps that we can't bare to get rid of.


Now for the Flora Fiesta Embroidery project by Molly and Mama...


I didn't want to look too much at the original while I was trying to decide what colors go where. I went with the colored floss that I liked since there was no color chart included in the tutorial. This leaves a lot of room for creativity. I was also thinking at one point to make it using just white floss for a very monchromatic look.

I played around with different stitches, I added French knots to the center of flowers and used a stem stitch instead of backstitching. I was so excited about this project becasue I haven't had embroidered in such a long time. I started hand embroidering as a child and I just haven't taken the time to sit and get into a project.


I ended up reducing the pattern to 80% and was able to fit in in a 5 inch hoop. The suggested hoop size at 100% is 6 inches. The fabric is Robert Kaufman linen from Club Tissus.

Another fun gift done! This is great to hang on a wall in a child's room or use the design on a pocket or the front of a dress bodice.


On to my final project (for this blog post anyways). The Sewperior Fruit & Veg bags are such a fantastic idea for reducing waste! I used a mesh type screen fabric, again purchased at club Tissus.  I was beyon elated to see that they had this fabric on hand. It was a little more pricy than I thought it would be but in a long run it will save a lot on waste.


Grab a few of these bags before heading to the grocery store and they are perfect for fresh produce. What used to happen when I went grocery shopping is I would just drop the produce in the plastic bag in the fruit or vegetable drawer and often enough I would forget about it because I didn't take the time to take it out of those darn plastic bags. Now with these reusable bags I have to remove the porduce and prep it right away and I get to see what I have in the fridge.


I added a fun cotton print to the top of the bag to make the casings. Two sizes are mentioned in the tutorial. They are a great guideline but of course you can make them the size you want.


And yes, they make great hostess gifts, or teachers gifts, or anyone who is into reducing waste ans recycling.


Once again I also got to review the full issue and there are a couple of articles that got my attention. the first being 10 tips for faster sewing. A few of the tips I already did without knowing but one that I felt helpful was tip number 6. Its mostly a tip for bag making but the same tip can be useful when doing a lot of appliqué work and using Heat 'N Bond.

Then there's the article on Tiyamike Sewing by Jo Ong.  Its all about giving opportunity to women and girls in Blantyre, Malawi, Africa. These women and girls are learning to sew and learning about running there own business once they've graduated. Follow Tiyamike Sewing on Facebook  for more information.


Here's a quick look at what patterns you'll expect to in One Thimble No.17. Take a look at the other stops on this tour for more fun and more inspiration.


11/9/2017

11/10/2017

11/11/2017

11/12/2017

11/13/2017

11/14/2017

11/15/2017

Thursday, November 9, 2017

Sloane Sweater Blog Tour

I know I say this everytime I make myself something new, but I think this has got to be my favorite! I love my jeans, my boots, and yes I love my Sloane!  


Sloane by Love Notions (affiliate link) may seem like a very simple top BUT that all depends what you do with it, what fabric you select and what options you include in your design.


At first I was thinking simple, grey, cozy, ready for all seasons type look, you know something that's easy to wear to the grocery store. But why, why should I (or we) limit ourselves to plain even for the grocery store. This is when it hit me, I was going to do the version with the yoke. I knew right off I was going to make the scalloped hem option, and I also have tons of hoodies so it was time to make the regular rounded neckline.


I was in search for lace! A lace with a slight stretch so I wouldn't have to play around to give myself ease at the shoulders.


And there it was, calling to me from the table it was sitting on, just waiting for me to dicover this beautiful scalloped edge.


I cut away the straight edge of the lace carefully and instead of sewing with right sides together for the back yoke seam, I layered them to reveal that pretty edge.


In the Sloane pattern you'll find all you need to create knit tops with different looks everyday of the week... you need to check out the other blog posts on the tour to get those creative juices flowing.


I'm thinking I need to go get more Sloanes on my cutting table, and not just for going to the grocery store! 


Saturday, October 28, 2017

Dress Up Hoodie by Mouse House Creations

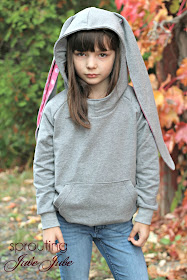
Just a little bit of trivia about me, I actually don't care for making Halloween costumes. There, I've said it!  This year is a little different thanks to Mouse House Creations and the Dress Up Hoodie (affiliate link). 


I love this idea of making something and it being used a lot more than just one evening! These hoodies are so cute and comfy that I know my girls will want to wear them at least once a week, every week until they're worn out!

And look at all these options, all in one pattern!

  • Dino
  • Unicorn
  • Horse
  • Rabbit (that's the one JubeJube has on)
  • Shark
  • Cat (Amelia begged me to be a black cat, AND DONE!)
  • Deer
  • Bat
  • Butterfly
  • Owl
  • Even a plain everyday hoodie for those who don't play dress up.


And with a little bit of imagination I bet you can get a ton of animals and other creatures put together with the help of this pattern.


Sizes in this pattern rage from 6 months to 12 years. And not to worry, the layering feature is included with this pattern to print only the sizes you need to save on ink, but also a print chart so you can print only the special options you need in creating your creature.


And this is my bunny with an atitude!


The basic hoodie is a raglan style sleeve with a lined hood and front pocket. Seam allowances included in the pattern are 3/8". I did most of my assembling with my serger so its a very quick sew.


Go take a look at more inpsiration in the facebook group Mouse House Creation: Group 'O fun.


Until next time, xx. 

Thursday, October 19, 2017

Canada Cups Part 2 with Chelsea Celeste Designs

This project with Chelsea Celeste Designes became a little of an adventure... The end result was great but how I got there was a lot of work and adjusting! 


First thing that needs to be realized is that Chelsea Celeste Designs are drafted mainly for pregnant women, but it doesn't mean every woman can't use these patterns to make themselves bralettes, dresses, or even just a bodice.

I made myself the Sweetheart Bodice.

First thing is measurements... ok, so I took my measurements, and I know I want to be comfortable, and not too tight, but also need to take the elasticity of my fabric into account. Took a look at the chart and was between a medium and a large. If this is the case for you SIZE DOWN! I didn't, I made myself a large, and ended up having to pull it all apart and unsew my serged seams. The end result, I mashed a small and medium together to create perfect fit.


Ok, I know some of you may be rolling your eyes wondering why oh why did I waste time pulling apart seams that had been serged when it would have been faster to just make another. First I hate wasting, if I can avoid it I will never trash an unfinished project. But also this fabric comes from Club Tissus and I had it shipped to me (even though I'm a hop, skip and a jump away from the store) for the purpose of the tour and to be able to talk about their new online service!


The fabric is Art Gallery's Bountiful by Sharon Holland. Club Tissus has quite the selection of Art Gallery knits, wovens and cotton voile, along with many other high quality designers. I also got my bra making supplies from Club Tissus, rings, slider, elastic straps... OH Gosh! what a selection! So once I filled up my cart, entered the shipping info, I thought I'd have at least a week to wait before I'd receive my order. Thank goodness I didn't place a bet on that because I would have lost... I kid you not, 48 hours later I had my order in my hands! And everything was exactly as I had ordered, no mistakes! AND FYI if you want to get free shipping from Club Tissus, use the code "LIVRAISON100" at checkout with every purchase of $100.00 or more and make sure you select free shipping as the shipping method to activate the code!

So, back to the pattern... What I liked about this pattern in the shape of the sweetheart neckline, that is one thing that stayed intact. I also really appreciated the princess seams at the front, this pattern is not just a flat piece of fabric for the front bodice.


I added the sliders to be able to adjust the length of the straps,  and added some lace trim that I had on had. That part was not in the tutorial.


And What's a bralettle without undies to match! Remember how last year (click here for fash back) I took Beverly Johnson's Craftsy Class... Sewing Panties: Construction & Fit  (affilate link)... well that class has been put to good use and I've been having so much fun drafting my own!


You have at least two other posts to go check out today... Filles à Maman and Mrs. Weaver's Finest!


Here is the list of prizes, so be sure to come back on the last day of the tour to enter the giveaway! Take advantage of some of the coupon codes that are already activated, just for you 😉

Tour Discounts

  • Funky Monkey Fabrics is offering a 10% discount for the duration of the tour. Use code: CC10 for 10% off store wide until October 22nd. Not valid on already discounted full bolts.
  • 20% discount storewide at Fabric Please. Use code CANADACUPS.
  • 10% discount from Central Sewing Machines. Orders must be mailed to Muriel @ centralsewing.com to have the discount applied manually.
  • 10% discount from Midnight Mountain Fabrics. Use code CANADACUPS10
You'll find the giveaway on Michelle's Creations when she wraps up the party on Saturday. Meanwhile, check out these prizes:


Tour Schedule

Hang with us as we reveal our inner secrets. ;)

Canada Cups Tour 2017 // Please note that none of these post links are available before the scheduled date. If you click on one too early, you will get an Error 404: Page not found. You know about those, right? // Sunday, October 15
Monday, October 16
Tuesday, October 17
Wednesday, October 18
Thursday, October 19
Friday, October 20
Saturday, October 21
Monday, October 23
  • Giveaway winners announced on all the blogs:
Little Heart Threads, Glitter in my Coffee, Michelle's Creations, Mrs. Weaver's Finest Unmentionables, Gracious Threads, Élégantine!, That's Sew Venice, Sprouting Jubejube, Flying by the Seam of my Pants, Filles à Maman