Wednesday, April 30, 2014

EYMM Mommy and Me Blog Tour

JubeJube is all about mommy and me thanks to TV advertising Mother's Day. She was all about giving hugs and it didn't take much convincing to get her to take pictures with me for this special  blog post. I was able to use the newest pattern from Everything Your Mama Made & More, (affiliate link) the California dress and peplum. The child sizes (newborn to tween 18) is only available right now as the bundle up promotion put together through Pattern Revolution (click here for more info!) and the women's sizes (XS- 5XL) have yet to be released but it shouldn't be long now.


JubeJube got the peplum made from a cotton linen blend jersey knit in a solid color.


I added a little embelishment at the waistline to fancy it up a bit.


I went way out of my usual comfort zone and made myself the ankle length dress.


I've decided that this is my go-to-pattern for a comfy dress with style.


A quick view of the back neckline (which can also be switched around worn in the front to make it look like a halter), the child's version is made the same way. 


Saved the sweetest image for last. 


Even if the pattern is not yet available as a bundle there are other great mommy and me pattern bundles available, just go check them out at Everything Your Mama Made & More!  You can also go check out PiePie Designs to see her take on the mommy and me Dolman Top.

Until next time, xx.


EYMM Pattern Tour www.eymm.com

4/28 - Lisa www.piepiedesigns.com

4/30 - Deborah www.sproutingjj.blogspot.ca

5/1 - Alyssa www.calmandcarrion.blogspot.com

5/2 - Tasha www.FriendsStitchedTogether.wordpress.com

5/3 - Emily Www.justanothersewingmama.com

5/4 - Nienke www.pienkel.blogspot.com

5/5 - Shino www.nutta.typepad.com

5/6 - Melissa www.rebelandmalice.blogspot.com

5/7 - Erin www.craftybiggers.com

5/8 - Jessica www.bunchoberries.blogspot.com

Tuesday, April 29, 2014

Girls' Skirt Pattern No.5 By E+M Patterns Giveaway

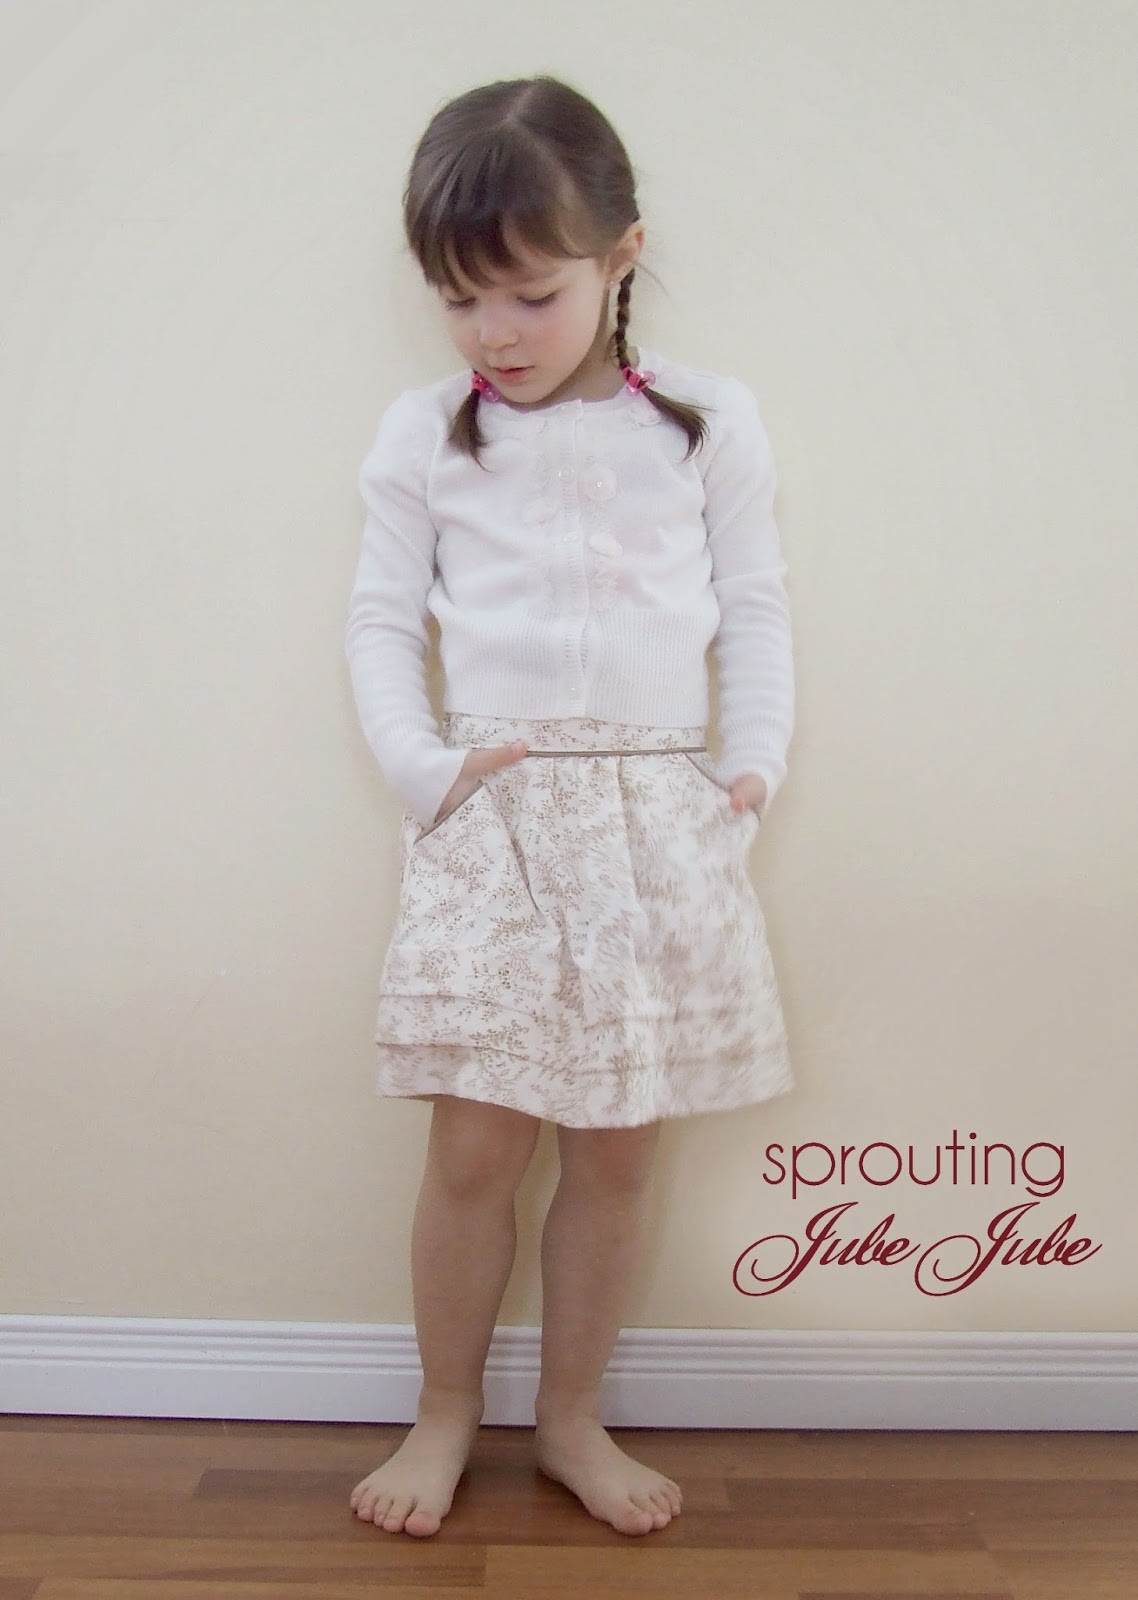
So last week there was a blurb about the new skirt pattern E+M Patterns released, then I did a little tutorial on how to revamp this skirt pattern to add pockets and piping details. Today, I have a lucky reader who could win the skirt pattern! So read to the end to enter through Rafflecopter!


So many ways to change up this pattern to make this skirt as dressy or as simple as you want it.


So there you have it...the same pattern, 3 skirts and 3 different styles. Now the fun part...the giveaway!

Until next time, xx.


a Rafflecopter giveaway

Thursday, April 24, 2014

Hip Pockets with Piping Detail

Adding a Hip Pocket and Piping to Girls Skirt Pattern No.5 by E+M Patterns.


You will need:
Pattern /tutorial that you can purchase here.
Fabric requirements, plus a little extra for the pockets (a about 10 inches), and any other material on the list in the tutorial.
1 package premade piping.
1 hip pocket pattern piece or you can draft your own.
zipper foot for your sewing machine.

First cut out the skirt and the waistband using the dimensions given in the tutorial  by E+M


Now we're going to cut out the pockets. I used the same pockets that you can find in the Children's Pants pattern by E+M Patterns. It just makes it a lot easier and faster when you don't have to draft it, but this piece would be easy enough to create. Do remember that the top of the waist must remain straight and that the side seams are also straight.


***Also remember to check the height of the tucks that will be formed on the skirt ( if you're making the skirt with tucks). You may have to adjust the height of the pocket to make sure it doesn't get in the way of making the tucks.


Cut out the opening just on the front of the skirt using your pattern piece.

The pocket lining is on the left and the pocket yoke is on the right. Cut 2 of each mirror image.

Then cut out 2 pocket linings and 2 pocket yokes.


Start by basting the piping to the front on the skirt. This is where the zipper foot comes in handy, it allows you to really get close to the piping.


Now lay the pocket lining over the skirt front and piping with wrong sides together matching the curve of the pocket opening, and again using the zipper foot to stitch as close as can be to the piping.


Clip seam allowance without cutting through the stitching. This will allow for an nice curved finish to the pocket opening.


Flip over the pocket, press and you can even topstitch along the curved pocket opening.


Match the pocket yoke to the lining and stitch along where you see I have a blue dotted line. You can then finish your seam off with a serger or zigzag stitch on a regular machine.


Baste a few stitches at the top waistline and at the side seam to keep the pocket in place. The skirt front can now be sewn to the skirt back.


For the waist band, I didn't want to have the piping go all the way around. It would just get too bulky with the elastic casing. Sew the piping to the front waistband and then sew the front to the back waistband at the side seams.

Baste skirt at waistline to be able to gather skirt to have it fit in the waistband matching up the side seams. Stitch skirt into place.


Continue sewing as indicated in the tutorial, Girls Skirt Pattern No.5 by E+M Patterns. 


Until next time, xx. 

Wednesday, April 23, 2014

Just a Blurb: Girls Skirt Pattern No.5 by E+M Patterns

I haven't been sharing a whole lot, and a blurb is all I have time for now, but I really want to get in the new pattern coming out by E+M Patterns, Girls Skirt Pattern No.5...And you can even go visit their new website because along with a new skirt pattern, there's also a pretty new place to purchase E+M Patterns!

This is the fun type of pattern where you measure twice, cut once. No pattern pieces to print and tape. (I do love those!)


See how cute with the underskirt and the tucks on the top layer! And all this is as simple as measure, cut, sew, and measure some more to get those tucks, sew and you're done.


What's nice is that the waistband is not just an elastic casing, its an actual waistband with an elastic at the back for comfort and fit. All the pretty finishes you've come to expect from E+M Patterns are all in there too.


Here's another without the underskirt...


And here's a sneak peek of a tutorial I'll be posting really soon about adding hip pockets to this skirt and a little piping detail! 


Until next time, xx.

Thursday, April 17, 2014

Girls' Piko Top a Design by Everything Your Mama Made & More

The Piko Top pattern was released last week by Everything Your Mama Made & More (affiliate link), so I'm a little late, but I really wanted to post it because its just so unbelievably on trend. Infact while shopping with Sabrina, my oldest daughter that says she wants clothes with real labels (I love that she actually said that to me!) , I tried on a very comfy Piko Top. I didn't buy it because I knew I could make it myslef. Here's the one I made for JubeJube.


I found this knit fabric in the liquidation section at my local fabric store for a steal. 

I made a very basic version of the pattern with 3/4 length sleeves. There's a bunch of options included in this pattern including different sleeve lengths and different hemlines.


The neckline on the version I made is a little wide, so its perfect for layering, either with a cami or a long sleeve t-shirt.


This top was made in less than an hour, and yes JubeJube loves it! Infact I may even make my own because its even available in women's sizes! 

Until next time, xx.


Wednesday, April 16, 2014

Ballon Top a Design by Heidi&Finn

Spring is having a hard time showing itself this year in Montreal but that hasn't stopped me from making a spring wardrobe for the girls. This time I was testing the new Ballon Top from Heidi & Finn. 


This picture was taken on Saturday, but I kid you not, there is a thin blanket on white stuff ouside this morning! Ok now back to this top....


I used a knit as required for the main fabric and the overlay is a chiffon print fabric. The overlay can be made all the same length or made long in the back as I did. There are also different sleeve length options; short, 3/4 length and long.


I'm not going to tell you that this top was super easy. I must admit that working with chiffon is quite slippery, and sewing it to a knit fabric can be a little tricky. I suggest if you try this to take your time and do some basting. The end result will be so worth the extra effort and time. Also try looking for a nylon chiffon, its not as slippery and you don't have to worry about faying edges.


Until next time, xx.


Tuesday, April 15, 2014

Willow and Co. Sneak Peek: Ash Jumpsuit

Saddly this is the last stop for me, but there are other patterns that will be available from Willow and Co. along with the ones you've already seen here and here. The release date for all the patterns in the Wanderlust collection for spring and summer 2014 is set for April 22nd, just 8 days away! Now last but not least is the Ash Jumpsuit designed by Celina at Petit à Petit & Family. (BTW, you'll want to visit Celina's blog to see how creative she is with her entries of Project Run & Play)


For this one I chose a light weight cotton, I wanted to make sure that it would get some wear this summer, so light and airy was the way to go with our hot and humid summers.  


This all seems like a very straight forward patten, but there are options to be able to change it up, like making the pants and top as seperates, and adding inseam pockets. 


This little number is so on trend too, I've seen them all over store fronts (I seriously even want one for me!) 


So that's it for me, but don't forget to vist Willow and Co. to see where the inspiration for this collection came from and to look at what else will be released on the 22nd of April.

Until next time, xx.